

If you’re thinking about redoing your kitchen’s backsplash, you’ve probably considered using peel and stick tiles. These easy-to-install sheets of tile are heat-resistant, versatile, and come in a variety of colors. However, there are a few things to consider before choosing a peel and stick tile for your kitchen.
Easy to install
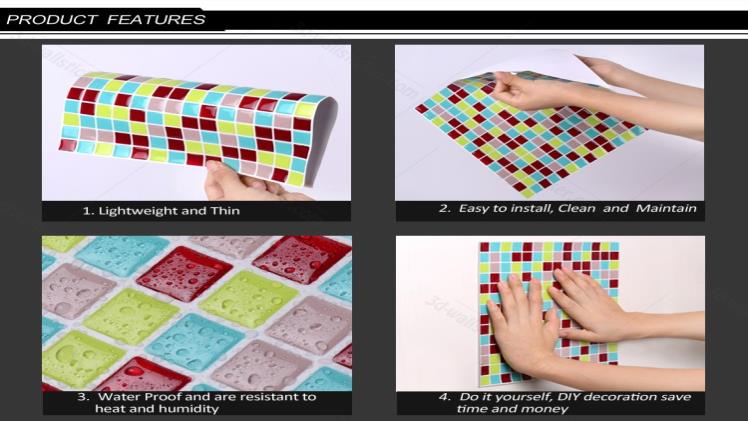
If you’re looking for an easy kitchen backsplash tile, you’ve come to the right place. Peel and stick kitchen backsplash tile can be applied over existing tile and doesn’t require removing the old backsplash tile. However, you need to apply an edging to the edges. Some peel and stick tiles come with an edging kit that will help you with the job.
Before applying the tiles to the wall, you need to make sure that the surface is clean. Kitchen walls tend to collect grease and other grime. To make sure the tile will stick properly, clean the wall with a degreaser and prime it with STIXX primer. Allow the primer to dry before proceeding. Once the wall has been cleaned and primed, add some construction glue or liquid nails to the back of the tile.
Versatile
Peel-and-stick tiles are a great choice for your kitchen backsplash because they are easy to install and remove. While installing a peel-and-stick backsplash, you must follow certain instructions to ensure that the final result is perfect. First, you should make sure that your surface is clean. You can use a cleaning spray or solution to clean away any accumulated gunk from the walls. Once done, allow the surface to dry thoroughly.
Peel-and-stick backsplashes are available in a variety of materials, including water-resistant vinyl, hardened silica gel tiles, and real mosaic tiles. The appearance of these backsplashes is very realistic and closely resembles that of a tile backsplash. In addition to being easy to install, peel-and-stick products are also 100% do-it-yourself friendly. Unlike other materials, peel-and-stick tiles can be removed and replaced with just a rag.
Installing a peel and stick backsplash is a relatively easy DIY project, but it does require some wall prep and practice. First, make sure that your backsplash wall is clean and dry. This will ensure that the stickers stick to the wall correctly. Also, remove any grout lines. If you do not want to use grout, you may use a hairdryer to soften caulk and remove it before applying the tile.
Peel and stick tiles are a great option for kitchen backsplashes. They’re easy to install and inexpensive. Peel and stick tiles simply peel away from their backing and stick to the wall. You can also adjust their position by misting the adhesive with soapy water. Peel and stick backsplash tiles are a great choice because they don’t require grout or glue.
The next step in installing a peel and stick backsplash is to mark the space where the tiles will be placed. You can use a level to make sure that you measure the area properly before you start. Next, use a craft knife to cut the tiles to the correct dimensions. You’ll want to position them flush against the edge and corner of the backsplash. You’ll want to trim the tiles so that they fit flush with the walls of the kitchen. If you’re unsure about what sizes to cut, refer to the instructions included with the product.
Installing a peel and stick kitchen backsplash is a great way to add color and spice to your kitchen. It is an easy project that won’t break the bank. Peel and stick tiles are inexpensive, water resistant, and easy to maintain. These tiles make installing a backsplash a breeze, and the end result will be a gorgeous kitchen area.
As long as you know what you’re doing, you should be fine with the process. Once you have the tiles cut to size, remove the backing and install them on the wall. Peel and stick tiles require no grouting, so the process is simple.
Depending on the size of your backsplash, you may have to make some alterations. To avoid a sharp knife cutting the tiles, you can trace the outline of the room using a kraft paper template. This template will help you make sure you get enough tiles for the area.
The process is quite easy, but you should make sure to measure the space and plan the layout. Start by removing the protective backing and then peeling one edge of the tile at a time. Then, peel off the remainder of the backing paper until the whole back is exposed. When you’ve removed the backing paper, the tiles should lie flat against the surface.
Heat resistant
When installing a heat resistant kitchen backsplash, choose a material that can withstand high temperatures. The best option is a non-porous tile, such as ceramic. Porcelain tiles are particularly hardy and can be glazed to resist moisture. Ceramic tile is also very easy to clean, but it is best to use glazed tiles, as porous tiles may stain. Marble tiles are another good option, but they require regular sealing to stay stain-free.
If you do not want to spend the time and money to install a tile backsplash, consider a heat-resistant peel-and-stick backsplash. These are easy to install and come in a variety of colors. Kitchen backsplash peel and stick are also environmentally friendly.
Easy to remove
If you’ve ever had to remove a kitchen backsplash, you know how difficult it can be. Before you can remove it, you have to assess the situation carefully. There are several ways to remove this type of backsplash without causing any damage to your walls. If you’re using a metal backsplash, you should use a metal scraper to ease the removal of the backsplash.
Conclusion
First, remove any power outlets from the backsplash. Then, you can install new tiles. To do this, you must carefully remove the thinset. A 6-in-1 painter’s tool can help you do this job.